Wednesday, 21 September 2011

VSeWSS 1.3 Post-Install Configuration

If you’re trying to install VSeWSS 1.3, the latest version of the Visual Studio Extensions for Windows SharePoint Services, you may find that you need to tweak a couple of things post-install to make sure the VSeWSS 1.3 web service is configured correctly.
To give you a little context, when I first installed the default installation and then created a web part project to test deployment I was getting the following error. This was resulting from the VSeWSS 1.3 WCF web service not having the appropriate permissions.
clip_image002

Note: To install VSeWSS 1.3, Kirk Evans gives a good overview here:
http://blogs.msdn.com/kaevans/archive/2009/03/17/installing-vsewss-1-3.aspx
For post-install config—i.e. to rid yourself of this error message, you might find you need to follow these steps:
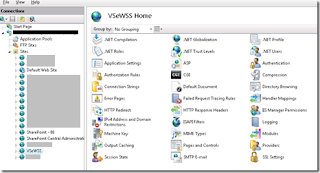
1. Open IIS and verify that you have a VSeWSS web service app.

 2. Click Advanced Settings on the  VSeWSS web app to ensure it is using the SharePoint Central Administration v. 3 application pool.
image
3. Go to the SharePoint Central Administration v.3 application pool and make sure that the Identity is running as NetworkService.
image
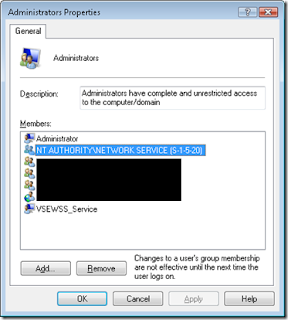
4. Go to Computer Management and click Groups, Administrators and then Add. You’ll want to, if it’s not already, add the NetworkService to the Administrators group. (Click Advanced, Find Now, and then select Network Service from the results.) Click OK to get out of the Administrators Properties dialog.

 
5. Reset IIS.
Once this was complete, I was able to go back and create a web part and successfully deploy into my local SharePoint site.

Monday, 19 September 2011

Deploying a WebPart Solution in SharePoint 2007 the simple way

Deploying web parts into MOSS 2007 isn’t exactly straight forward and after looking around the web for a while it became apparent that there is no ‘standard’ way for deploying them. I looked at a few different options and found that creating a Solution file using Visual Studio’s CAB Setup Project was the easiest and most reusuable way of accomplishing this task.
Below is a step by step guide to developing and deploying a simple WebPart.
First we need to create a WebPart to deploy, the easiest way I have found of doing this is to download the Visual Studio SharePoint extensions from Microsoft which can be located here.
After installing the extensions open Visual Studio and create a new project. You should now have some extra project templates under the SharePoint section.


Select ‘Web Part’ project, give it a name and click OK.
Visual studio will now create a basic Web Part class for you to edit.
My Web Part was called ClientViewerWebPart and I inserted some code into the overridden Render method which basically outputs data from a SharePoint list. This code looks like this so far:

using System;
using System.Runtime.InteropServices;
using System.Web.UI;
using System.Web.UI.WebControls.WebParts;
using System.Xml.Serialization;
using Microsoft.SharePoint;
using Microsoft.SharePoint.WebControls;
using Microsoft.SharePoint.WebPartPages;


namespace ClientViewerWebPart
{
    [Guid("6bf05a67-118d-4cc4-80f7-b923be02773a")]
    public class ClientViewerWebPart : System.Web.UI.WebControls.WebParts.WebPart
    {
        public ClientViewerWebPart()
        {
            this.ExportMode = WebPartExportMode.All;
        }


        protected override void Render(HtmlTextWriter writer)
        {
            SPSite site = new SPSite(“http://leesbs/”);
            SPWeb web = site.OpenWeb();
            SPListCollection collection = web.Lists;
            SPList list = collection.GetList(new Guid(“{936518FF-CC2E-4BD9-ABB9-0580EA04BCD6}”),                         false);

            for (int index = 0; index < list.Items.Count; index++)
            {
                SPListItem item = list.Items[index];
                writer.Write(“<table>”);
                writer.Write(“<tr><td>Client Name</td>”);
                writer.Write(“<td>” + item["Client Name"].ToString() + “</td></tr>”);
                writer.Write(“</table>”);
            }
        }
    }
}
Next we need to tell SharePoint to allow this web part to be executed from a partially trusted location. We do this by making an entry into the web parts AssemblyInfo file.
In Solution Explorer Expand Properties and open up the AssemblyInfo.cs file. At the bottom of the file insert the following:
[assembly: System.Security.AllowPartiallyTrustedCallers()]
Now we need to add a manifest file to out Web Part project. This manifest file is what defines our solution and tells SharePoint everything it needs to know about our Web Part.
Add a new XML file to tthe project and rename it manifest.xml. Insert the following XML into the file:
<?xml version=“1.0“ encoding=“utf-8“ ?>
    <Solution xmlns=“http://schemas.microsoft.com/sharepoint/“
                    SolutionId=“{E3CF88A3-0EC3-49b9-B09E-5F84417EC6ED}“>
        <Assemblies>
            <Assembly DeploymentTarget=“WebApplication“
                                  Location=“ClientViewerWebPart.dll“>
                <SafeControls>
                    <SafeControl Assembly=“ClientViewerWebPart, Version=1.0.0.0, Culture=neutral,                                                                                         PublicKeyToken=3858ebd08dca7ee0“
                                            Namespace=“ClientViewerWebPart“ TypeName=“*“/>

                </SafeControls>
        </Assembly>
    </Assemblies>
</Solution>


You need to provide your own GUID value for the SolutionId attribute, you can do this within Visual Studio by using the GUID Generator under the Tools menu. You also need to enter your assemblies PublicKeyToken value which can be found by either using ILDASM.exe or Reflector.

The last thing we need to do to our Web Part project is make sure it has a strong name when it’s compiled, you can do this either using the SN.exe command line tool, or opening the project properties from within Visual Studio and navigating to the Signing section. From here you can create a new key file which will be used to strong name the assembly at compile time.

Now we have a fully working Web Part which can be compiled, what we need to do now is deploy this Web Part into our SharePoint site.

We are going to use a Visual Studio setup project to accomplish this, so add a new project to the same solution your Web part project is in, and create a CAB setup project. I called my setup project ClientViewerWebPartSetup.

Right click on the project and goto Add -> Project Output, from the ‘Add Project Output Group’ dialog box, select your Web Part project and then select ‘Primary Output’.

Repeat the step above but this time instead of selecting ‘Primary Output’ select ‘Content Files’.

After this is done you should have a solution that looks something like this:


Now you can compile your setup project, this will create a cab file containing the WebPart assembly and the manifest.xml file so all we need to do now to create our SharePoint solution file is rename our .cab file to .wsp.

We are now ready to deploy this solution file into SharePoint and we do this by using the STSADM.exe tool. This tool is located in your SharePoint installation directory under the bin folder mine was located here C:\Program Files\Common Files\Microsoft Shared\web server extensions\12\BIN. I strongly suggest you add this path to you PATH environment variable for ease of use.

You need to use the addsolution argument to the STSADM tool the first time you deploy a Web Part into your SharePoint site. When updating the Web Part you can use the upgradesolution argument.

The following is how I deployed my Web Part into my SharePoint site for the first time.


Great! Your Web Part is now deployed into your SharePoint site, or is it?

We need to do one more thing to make out Web Part available to our SharePoint site.

Open up Central Administration and navigate to ‘Operations’ under ‘Global Configuration’ click ‘Solution Management’. You should see your Web Part Solution sitting in the list with ‘Not Deployed’ as it’s status. Click on the Solution and click the ‘Deploy Solution’ button.

You should now be able to add your Web Part to any sites Web Part gallery.

Hope this guide has been useful, it’s quite a lengthly process do first time, but should get easier the more times you do it.

Sunday, 11 September 2011

Simple Windows Service Sample


Introduction

As a matter of fact Microsoft Windows services, formerly known as NT services enable you to create long-running executable applications that run in its own Windows session, which then has the ability to start automatically when the computer boots and also can be manually paused, stopped or even restarted.
This makes services ideal for use on a server or whenever you need long-running functionality that does not interfere with other users who are working on the same computer. You can also run services in the security context of a specific user account that is different from the logged-on user or the default computer account.
Windows services don't have any interface to the user, so it can not be debugged like any regular application, but it's debugged as a process. .NET has a very nice tool that enables processes debugging while it's in the run status, by easily pressing Ctrl + Alt + P shortcut.

Background

I've searched well so many sites about a code that I can with the help of it, build a simple Windows service, but I found a lot of code on how to manage the current Windows services of the system and that's through theServiceController class.
After searching the MSDN, I've found some nice code that helped me to create this simple Windows service. Hope it can help as a basic architecture for and usage of such a Windows service.

Using the code

At first you should simply open VS.NET and then at the File menu click on New, Project. From the New Project Dialog Box, choose the Windows service template project and name it MyNewService like shown below:
Winows Service New Project

The project template automatically adds a component class that is called Service1 by default and inherits fromSystem.ServiceProcess.ServiceBase.
Click the designer. Then, in the Properties window, set the ServiceName property for Service1 toMyNewService.
Set the Name property to MyNewService. Set the AutoLog property to true.
In the code editor, edit the Main method to create an instance of MyNewService. When you renamed the service in step 3, the class name was not modified in the Main method. To access the Main method in VC#, expand the Component Designer generated code region.
static void Main()
{ 
    System.ServiceProcess.ServiceBase[] ServicesToRun; 
    //Change the following line to match. 

    ServicesToRun = new 
        System.ServiceProcess.ServiceBase[] { new MyNewService() }; 
    System.ServiceProcess.ServiceBase.Run(ServicesToRun);  
}
In the next section, you will add a custom event log to your Windows service. Event logs are not associated in any way with Windows services. Here the EventLog component is used as an example of the type of components you could add to a Windows service.
To add custom event log functionality to your service:
  1. In the Solution Explorer, right-click Service1.vb or Service1.cs and select View Designer.
  2. From the Components tab of the Toolbox, drag an EventLog component to the designer.
  3. In the Solution Explorer, right-click Service1.vb or Service1.cs and select View Code.
  4. Edit the constructor to define a custom event log.
To access the constructor in Visual C#, expand the Component Designer generated code region.
protected override void OnStart(string[] args)
{ 
    eventLog1.WriteEntry("my service started"); 
}
The OnStart method must return to the operating system once the service's operation has begun. It must not loop forever or block. To set up a simple polling mechanism, you can use the System.Timers.Timer component. In theOnStart method, you would set parameters on the component, and then you would set the Timer.Enabledproperty to true. The timer would then raise events in your code periodically, at which time your service could do its monitoring.
To define what happens when the service is stopped, in the code editor, locate the OnStop procedure that was automatically overridden when you created the project, and write code to determine what occurs when the service is stopped:
protected override void OnStop()
{ 
    eventLog1.WriteEntry("my service stoped");
}
You can also override the OnPause, OnContinue, and OnShutdown methods to define further processing for your component. For the method you want to handle, override the appropriate method and define what you want to occur. The following code shows what it looks like if you override the OnContinue method:
protected override void OnContinue()
{
    eventLog1.WriteEntry("my service is continuing in working");
}
Some custom actions need to occur when installing a Windows service, which can be done by the Installer class. Visual Studio can create these installers specifically for a Windows service and add them to your project. To create the installers for your service.
  1. Return to design view for Service1.
  2. Click the background of the designer to select the service itself, rather than any of its contents.
  3. In the Properties window, click the Add Installer link in the gray area beneath the list of properties. By default, a component class containing two installers is added to your project. The component is namedProjectInstaller, and the installers it contains are the installer for your service and the installer for the service's associated process.
  4. Access design view for ProjectInstaller, and click ServiceInstaller1.
  5. In the Properties window, set the ServiceName property to MyNewService.
  6. Set the StartType property to Automatic.

Tip

To avoid being asked about the system username and password you must change the Account for theserviceProcessInstaller to LocalSystem. This is done by opening the ProjectInstaller design and then selecting the serviceProcessInstaller, press F4 and then change the Account property to LocalSystem. Or you can manually do that by creating a class that inherits from System.Configuration.Install.Installerlike this:
[RunInstaller(true)]

public class ProjectInstaller : System.Configuration.Install.Installer 
private System.ServiceProcess.ServiceProcessInstaller 
                                  serviceProcessInstaller1;
private System.ServiceProcess.ServiceInstaller serviceInstaller1; 
/// <summary> 

/// Required designer variable. 

/// </summary> private System.ComponentModel.Container components = null;


public ProjectInstaller()
   // This call is required by the Designer.

   InitializeComponent();

   // TODO: Add any initialization after the InitComponent call 

} 
private void InitializeComponent() 
{ 
   this.serviceProcessInstaller1 = 
     new System.ServiceProcess.ServiceProcessInstaller(); 
   this.serviceInstaller1 = 
     new System.ServiceProcess.ServiceInstaller(); 
   // serviceProcessInstaller1 

   // 

   this.serviceProcessInstaller1.Account = 
     System.ServiceProcess.ServiceAccount.LocalSystem; 
   this.serviceProcessInstaller1.Password = null;
   this.serviceProcessInstaller1.Username = null; 
   // 

   // serviceInstaller1 

   // 

   this.serviceInstaller1.ServiceName = "MyNewService"; 
   this.serviceInstaller1.StartType = 
     System.ServiceProcess.ServiceStartMode.Automatic;

   // 

   // ProjectInstaller 

   // 

   this.Installers.AddRange
     (new System.Configuration.Install.Installer[] 
   { 
       this.serviceInstaller1, 
       this.serviceInstaller1});
   }
}

To build your service project

  1. In Solution Explorer, right-click your project and select Properties from the shortcut menu. The project'sProperty Pages dialog box appears.
  2. In the left pane, select the General tab in the Common Properties folder.
  3. From the Startup object list, choose MyNewService. Click OK.
  4. Press Ctrl+Shift+B to build the project. 
Service Project Property Page
Now that the project is built, it can be deployed. A setup project will install the compiled project files and run the installers needed to run the Windows service. To create a complete setup project, you will need to add the project output, MyNewService.exe, to the setup project and then add a custom action to have MyNewService.exe installed.

To create a setup project for your service

  1. On the File menu, point to Add Project, and then choose New Project.
  2. In the Project Types pane, select the Setup and Deployment Projects folder.
  3. In the Templates pane, select Setup Project. Name the project MyServiceSetup.
A setup project is added to the solution. Next you will add the output from the Windows service project,MyNewService.exe, to the setup.
Service Setup Project

To add MyNewService.exe to the setup project

  1. In Solution Explorer, right-click MyServiceSetup, point to Add, then choose Project Output. The Add Project Output Group dialog box appears.
  2. MyNewService is selected in the Project box.
  3. From the list box, select Primary Output, and click OK.
    A project item for the primary output of MyNewService is added to the setup project. Now add a custom action to install the MyNewService.exe file.

To add a custom action to the setup project

  1. In Solution Explorer, right-click the setup project, point to View, then choose Custom Actions. The Custom Actions editor appears.
  2. In the Custom Actions editor, right-click the Custom Actions node and choose Add Custom Action. The Select Item in Project dialog box appears.
  3. Double-click the application folder in the list box to open it, select primary output from MyNewService(Active), and click OK. The primary output is added to all four nodes of the custom actions  Install, Commit, Rollback, and Uninstall.
  4. Build the setup project.

To install the Windows Service

Browse to the directory where the setup project was saved, and run the .msi file to install MyNewService.exe.
Service Setup

To start and stop your service

  1. Open the Services Control Manager by doing one of the following:
    • In Windows 2000 Professional, right-click My Computer on the desktop, then click Manage. In theComputer Management console, expand the Services and Applications node.
      - Or -
    • In Windows 2000 Server, click Start, point to Programs, click Administrative Tools, and then clickServices.
      Note: In Windows NT version 4.0, you can open this dialog box from Control Panel.
  2. You should now see MyNewService listed in the Services section of the window.
  3. Select your service in the list, right-click it, and then click Start.
Right-click the service, and then click Stop.
Admin tools Services

To verify the event log output of your service

  1. Open Server Explorer and access the Event Logs node. For more information, see Working with Event Logs in Server Explorer.
    Note: The Servers node of Server Explorer is not available in the Standard Edition of Visual Basic and Visual C# .NET.
    Sample screenshot

To uninstall your service

  • On the Start menu, open Control Panel and click Add/Remove Programs, and then locate your service and clickUninstall.
  • You can also uninstall the program by right-clicking the program icon for the .msi file and selecting Uninstall.

public MyNewService()
{
 
    InitializeComponent()
    if(!System.Diagnostics.EventLog.SourceExists("DoDyLogSourse"))
    System.Diagnostics.EventLog.CreateEventSource("DoDyLogSourse",
                                                          "DoDyLog");

    eventLog1.Source = "DoDyLogSourse";
    // the event log source by which 


    //the application is registered on the computer


    eventLog1.Log = "DoDyLog";
}
To define what happens when the service starts, in the code editor, locate the OnStart method that was automatically overridden when you created the project, and write code to determine what occurs when the service begins running:

Monday, 15 August 2011

Exception from HRESULT: 0x80040E14

Hi All,

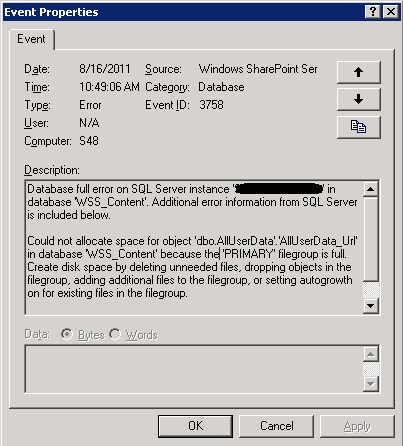
Most of the time, when you are trying to add a new record in Sharepoint 2007 List, you may face this error (Exception from HRESULT: 0x80040E14). So, don't worry, this error came, due to low diskspace in your Database Server.

To check the database server, please have a look on the attached images below:

This is the error that you may face while adding any new reocrd to the SharePoint List (MOSS2007).
To check details about error, open the event viewer in the server.

How to open the EventViewer

Go to RUN, type eventvwr, to open all the event that runs in the server. Check the lastet log error as below.
Then, open the content database in SQL Server Express, and go to properties as below

When you will open the properties, you can able to see two values (1. Size 2. Space Available ).
In mycase, my content database size is 4834.69 MB and Available Size is 1.18 MB. 


So to resolve this issue, you have to increase the size of your content database.

Thanks
Chandan Kumar Badajena 

Tuesday, 2 August 2011

STSADM Commands in MOSS2007

STSADM tool is used for command-line administration of Office SharePoint Server 2007. Stsadm is usually located at "C:\Program Files\Common Files\Microsoft Shared\web server extensions\12\BIN" and the user must have Administrative rights to use this tool. This tool provides access to the complete set of operations on the SharePoint Server 2007.

STSADM proves to be a boon when used with SharePoint migration tasks. One can easily carry out the IMPORT / EXPORT and BACKUP / RESTORE operations. The commands for these operations are listed below:

BACKUP:

stsadm.exe -o backup -url [site collection url] -filename D:\sitebackup\filename.bak

If the same file name is exist in the same location , then you have use the -overwrite command to overwrite the existing file with same name.

stsadm.exe -o backup -url [site collection url] -filename D:\sitebackup\filename.bak -overwrite

RESTORE

stsadm.exe -o restore -url [site collection url] -filename D:\sitebackup\filename.bak -overwrite

EXPORT

stsadm.exe -o export -url [site collection url] -includeusersecurity -nofilecompression -filename D:\sitebackup

IMPORT

stsadm.exe -o import -url [site collection url] -includeusersecurity -nofilecompression -filename D:\sitebackup

Note: D:\sitebackup\filename.bak and D:\sitebackup is just an example of a physical location used to generate / consume the file

To determine the lock status of the site, you can use the following getsitelock syntax:

stsadm -o getsitelock -url http://server_name/

Once the lock status of the site collection is determined, you can use the noaccess parameter of the setsitelock operation to lock out all users to the site:

stsadm -o setsitelock -url http://server_name/ -lock noaccess

After the site has been backed up, you can use the none parameter of the setsitelock operation to remove all locks to the site:
stsadm -o setsitelock -url http://server_name/ -lock none

SharePoint 2007 – Hiding fields on NewForm.aspx and EditForm.aspx, the easy way

One of the limiting factors in using the default forms (NewForm.aspx, EditForm.aspx) is that there is no obvious way to hide columns from appearing in the form.  By default all columns in a list or document library will appear in your forms. 
After doing quite a bit of research on this I found a fairly easy way to hide fields by using JavaScript within the form pages themselves.  In my research I found several different sets of JavaScript code, but some of the scripts are easier to implement than others.  Below I provide the best and most straight forward JavaScript and some simple steps to guide you along.
To hide fields in a SharePoint 2007 form, follow these steps (I will use the NewForm.aspx in my example)
  1. Open SharePoint Designer and navigate to the site that contains the list or document library you wish to customize.
  2. Expand the folder named “Forms” under the desired list or document library.  You should see about seven .aspx pages (AllItems.aspx, EditForm.aspx, NewForm.aspx, etc)
  3. Open the NewForm.aspx page and switch to the “code” view to edit the HTML of the page.
  4. Paste the JavaScript code immediately below the the following HTML tag <asp:Content ContentPlaceHolderId=”PlaceHolderMain” runat=”server”>  This will add the JavaScript to the HTML inside the content placeholder tag.  Note: be sure to include the entire script below, including the <script and </script> tags.
  5. Modify the “hidefields()” section of the JavaScript code to refer to each SharePoint list field name to hide.  For example, the code sample below will hide the SharePoint fields named Title, Document Link, and PublishDate    Notice that you do not need to worry about internal field names or field types like other JavaScript techniques, you simply need to know the name of the field.
  6. Save the changes.  Select “Yes” when prompted to “…customize the page from the site definition…”
  7. Test the form
<script language="javascript" type="text/javascript">

_spBodyOnLoadFunctionNames.push("hideFields");

function findacontrol(FieldName) {

   var arr = document.getElementsByTagName("!");
   // get all comments
   for (var i=0;i < arr.length; i++ )
   {
      // now match the field name
      if (arr[i].innerHTML.indexOf(FieldName) > 0)
      {         return arr[i];      }
   }
}

function hideFields() {

   var control = findacontrol("Title");
   control.parentNode.parentNode.style.display="none";
   control = findacontrol("Document Link");
   control.parentNode.parentNode.style.display="none";
   control = findacontrol("PublishDate");
   control.parentNode.parentNode.style.display="none";

}
</script>
 

Thursday, 28 July 2011

Services Unavailable: While Opening Central Administration site in Sharepoint

Hi All,

All of must see this error "Services Unavailabe", while accessing central admin in Sharepoint. I got an error message saying: Service Unavailable in the internet explorer. But my other MOSS sites were working perfectly fine!

I went into my IIS application pool for Central Administration web application, it had stopped without any reason. I tried to start it, and it would start but it did'nt solve the problem. I was stuck in the same loop i.e Service Unavailable when trying to access Central Admin web application.
Then i figured out that i need to change my System Account password which had full control to Central Admin web application. How do i do that ? Be careful, follow the steps properly:
Solution: Change the passwords if you receive a "Service Unavailable" error when trying to access Central Administration. Change the passwords for the Central Administration Web application pool identity and the Windows SharePoint Services Timer service by using the command line
  1. On the computer running the Central Administration Web site, open the command line and navigate to the Program Files\Common Files\Microsoft Shared\web server extensions\12\BIN folder.
  2. At a command prompt, type the following command, and then press ENTER:
    stsadm -o updatefarmcredentials -userlogin domain\username -password newpassword
    userlogin is the server farm account.
    For additional information, see Updatefarmcredentials: Stsadm operation (Windows SharePoint Services).
  3. You must restart the Web application pool for the changes to be saved. At a command prompt, type the following command, and then press ENTER:
    iisreset /noforce
  4. As an additional step, you can even Go to Start->Run and type services.msc and restart the Windows Timer services(which should use the newly changed password).
  5. Try accessing the Central admin site and it should work normally as before.


Thanks